So, you're diving into the world of electronics and wondering how to test a common anode display? Well, buckle up because this is going to be an electrifying ride! Imagine this: you're tinkering with some LED displays, and suddenly you're questioning if your common anode display is working properly. It's like being a detective, but instead of solving crimes, you're troubleshooting tiny lights. Let's face it, testing a common anode display can seem daunting at first, but once you get the hang of it, it's as easy as pie. Stick around, and I'll show you how it's done!
Before we dive deep into the nitty-gritty of testing a common anode display, let's talk about why this is important. Picture this: you're building a cool gadget, and the display is a crucial part of it. If the display isn't working, your entire project could go down the drain. That's where testing comes in. By knowing how to test a common anode display, you're not just ensuring your project works; you're also saving yourself from potential headaches down the road. It's like having a superpower in the world of electronics!
Now, let's get one thing straight. Testing a common anode display isn't rocket science, but it does require a bit of know-how. Think of it as learning a new language. At first, it might seem confusing, but with practice, you'll be speaking fluent "electronics" in no time. So, whether you're a seasoned pro or a newbie in the world of electronics, this guide is here to help you master the art of testing a common anode display. Ready? Let's get started!
Read also:Eyeconik Records The Rising Star In The Music Industry
Understanding the Basics of Common Anode Displays
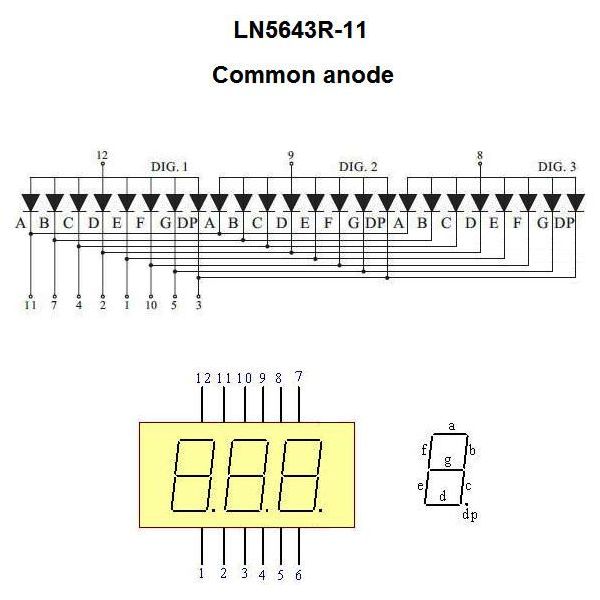
First things first, let's break down what a common anode display actually is. Imagine you're holding a tiny LED display in your hand. Now, in the world of electronics, there are two main types of LED displays: common anode and common cathode. The common anode display is the one where the anode (positive terminal) is connected together for all the LEDs. It's like having a central hub that powers all the lights. When you want to light up a specific segment, you simply connect the cathode (negative terminal) of that segment to ground. Simple, right?
Key Features of Common Anode Displays
Here's the deal: common anode displays have some unique features that set them apart. First off, they're super easy to control. You can turn on or off individual segments by manipulating the cathode connections. Plus, they're widely used in various applications, from digital clocks to calculators. But wait, there's more! Common anode displays are also energy-efficient, which means they won't drain your battery as quickly as some other displays might. Now, isn't that something to brag about?
Why Testing a Common Anode Display Matters
Alright, let's talk about why testing a common anode display is so crucial. Think of it this way: you wouldn't build a house without checking the foundation, right? Similarly, in electronics, testing your components is like laying a solid foundation for your project. By testing your common anode display, you're ensuring that every segment is working as it should. It's like giving your display a health check-up to make sure it's in top shape. Plus, it helps you catch any potential issues before they become major problems. Trust me, it's worth the effort!
Common Issues with Common Anode Displays
Now, let's tackle some of the common issues you might encounter with common anode displays. One of the most frequent problems is a dead segment. It's like having a flat tire on your car—it stops everything in its tracks. Another issue could be flickering lights, which might indicate a poor connection or a faulty driver circuit. And let's not forget about brightness inconsistency, where some segments are brighter than others. These are just a few examples, but don't worry, we'll show you how to identify and fix them later on. Stay tuned!
Tools You'll Need to Test a Common Anode Display
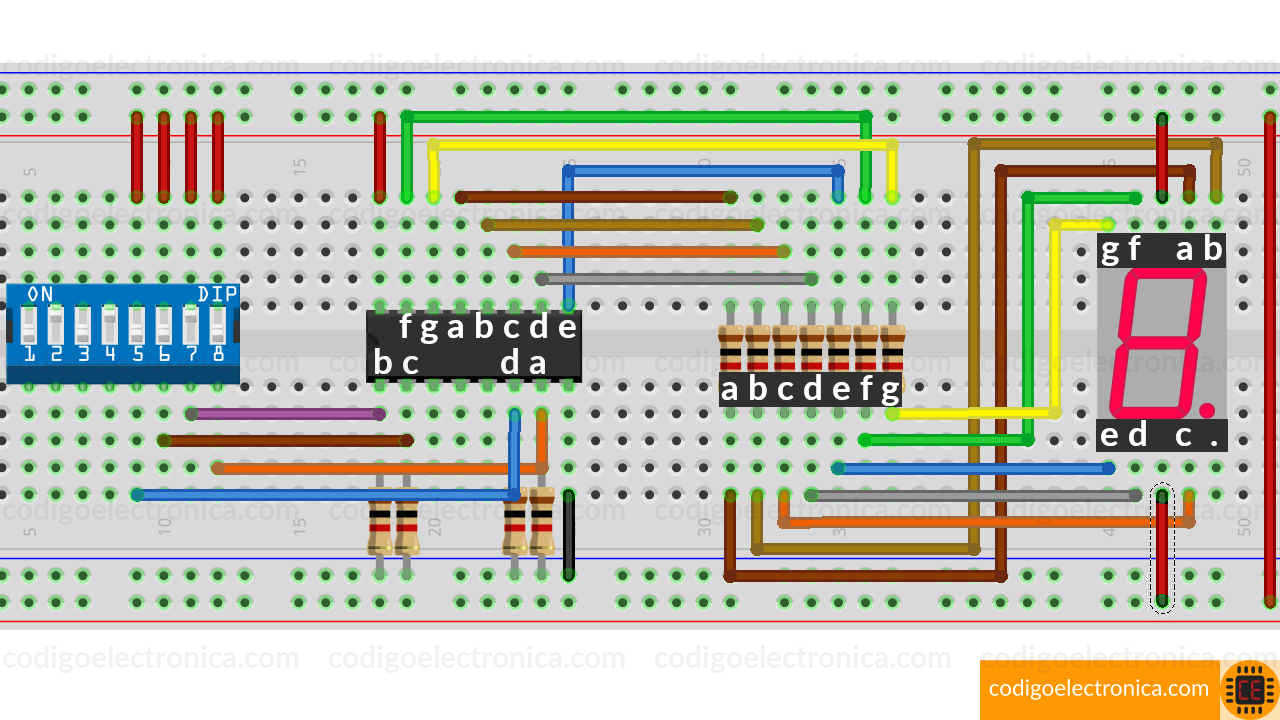
Before you start testing, you'll need a few tools in your arsenal. First up, you'll need a multimeter. Think of it as your trusty sidekick in the world of electronics. A multimeter allows you to measure voltage, current, and resistance, which are crucial when testing a common anode display. Next, you'll need a breadboard and some jumper wires. These will help you create a temporary circuit to test your display. Lastly, having a power supply handy is always a good idea. It's like having a backup generator in case of a power outage. With these tools, you're ready to roll!
Setting Up Your Testing Environment
Now that you have your tools, let's talk about setting up your testing environment. Start by placing your common anode display on the breadboard. Make sure it's securely in place so it doesn't move around while you're testing. Next, connect the anode pin to your power supply. This will act as the common positive terminal for all the LEDs. Now, here's the fun part: connect each cathode pin to your multimeter one by one. This will allow you to test each segment individually. Easy peasy, right?
Read also:41 And Main Your Ultimate Guide To Style Fashion And Beyond
Step-by-Step Guide to Testing a Common Anode Display
Alright, here's the moment you've been waiting for—the step-by-step guide to testing a common anode display. First, set your multimeter to the diode testing mode. This mode allows you to check the forward voltage drop of each LED segment. Next, touch the positive probe of your multimeter to the anode pin and the negative probe to one of the cathode pins. If the segment lights up, it means it's working properly. Repeat this process for all the segments. If a segment doesn't light up, it could indicate a problem. Don't worry, we'll cover troubleshooting tips later!
Tips for Accurate Testing
Here are a few tips to ensure accurate testing. First, make sure your multimeter is calibrated properly. A faulty multimeter can give you inaccurate readings, which could lead to wrong conclusions. Second, double-check your connections. A loose wire can cause a segment to not light up, even if it's perfectly fine. Lastly, take your time. Rushing through the testing process can lead to mistakes. Remember, patience is key in the world of electronics!
Common Mistakes to Avoid When Testing
Let's talk about some common mistakes people make when testing a common anode display. One of the biggest mistakes is using the wrong multimeter settings. If you're not using the diode testing mode, you might not get accurate results. Another mistake is not checking all the segments. Just because one segment is working doesn't mean they all are. Lastly, forgetting to check the power supply voltage is a rookie mistake. If the voltage is too low, the display might not light up properly. Avoid these pitfalls, and you'll be testing like a pro in no time!
How to Troubleshoot Common Issues
Now, let's dive into troubleshooting common issues. If a segment isn't lighting up, start by checking the connections. A loose wire or a bad solder joint could be the culprit. If the connections are fine, try swapping the multimeter probes. Sometimes, a faulty multimeter probe can cause issues. Another thing to check is the power supply. Make sure it's providing the correct voltage. If all else fails, it might be time to replace the display. But don't give up just yet—there's always a solution!
Applications of Common Anode Displays
So, you might be wondering where common anode displays are used. Well, they're everywhere! From digital clocks to calculators, common anode displays are a staple in many electronic devices. They're also used in scoreboards, speedometers, and even in some home appliances. The beauty of common anode displays is their versatility. Whether you're building a simple gadget or a complex system, common anode displays can fit the bill. And let's not forget about their cost-effectiveness. For the price, you get a reliable and efficient display solution!
Advantages of Using Common Anode Displays
Here's why common anode displays are a great choice for your projects. First off, they're easy to control. With just a few connections, you can manipulate each segment individually. Plus, they're energy-efficient, which means they won't drain your battery as quickly as some other displays might. Another advantage is their brightness. Common anode displays are known for their vibrant and clear display, making them ideal for applications where visibility is crucial. And let's not forget about their affordability. For the price, you get a high-quality display that can handle various tasks!
Best Practices for Maintaining Common Anode Displays
Now that you know how to test a common anode display, let's talk about maintaining it. First, always store your display in a dry and cool place. Moisture can damage the components, leading to premature failure. Second, avoid exposing the display to extreme temperatures. Heat can cause the segments to dim or even burn out. Lastly, handle the display with care. Dropping it or applying too much pressure can damage the delicate components inside. By following these best practices, you'll ensure your display lasts for years to come!
How to Extend the Lifespan of Your Display
Here are a few tips to extend the lifespan of your common anode display. First, use a proper driver circuit. A good driver circuit will protect the display from voltage spikes and ensure consistent brightness. Second, avoid running the display at its maximum brightness all the time. Lowering the brightness can significantly increase its lifespan. Lastly, regularly check for any signs of wear and tear. Catching potential issues early can save you a lot of trouble down the road. With these tips, your display will be glowing for years to come!
Conclusion: Take Action Today!
So, there you have it—everything you need to know about testing a common anode display. From understanding the basics to troubleshooting common issues, you're now equipped with the knowledge to test and maintain your display like a pro. Remember, testing your components is crucial for the success of your projects. So, don't wait—grab your multimeter and start testing today! And if you found this guide helpful, don't forget to share it with your fellow electronics enthusiasts. Together, let's build a brighter future—one display at a time!
Table of Contents
- Understanding the Basics of Common Anode Displays
- Why Testing a Common Anode Display Matters
- Tools You'll Need to Test a Common Anode Display
- Step-by-Step Guide to Testing a Common Anode Display
- Common Mistakes to Avoid When Testing
- Applications of Common Anode Displays
- Best Practices for Maintaining Common Anode Displays
- Advantages of Using Common Anode Displays
- How to Troubleshoot Common Issues
- How to Extend the Lifespan of Your Display
So, what are you waiting for? Dive in and start testing those common anode displays today!